|
M |
ary’s Tips To Make
MicroSoft
Word Work For You
Pictures in Word
Ways to get pictures:
1. Clips Online—Insert, Picture, ClipArt. ClipsOnline, follow instructions
2.
Print Screen Instructions:
To copy
the window or screen contents :
To copy an image of the window that is currently active, press ALT+PRINT SCREEN.
To copy an image of the entire screen, press PRINT SCREEN.
Note:
To paste the image into a document, on the Edit menu in the document window, click Paste
 c. From Disks
d. from a scanner
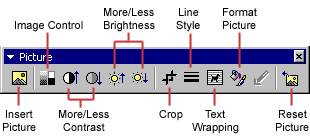
Ways to manipulate pictures:
![]() On View, choose Toolbars,
then Picture.
On View, choose Toolbars,
then Picture.
![]()
1. TextWrap Button – Choose and click a layout choice to pick up and move your picture.
2. Cropping – Choose Crop Button. Move changed cursor over side, or top, hold down
mouse button, and drag.)
(Note that as you move your mouse over each button, Word tells you what each one
does)
Drop Caps
A drop cap is a large letter that begins a paragraph and drops through several lines of text as shown below.
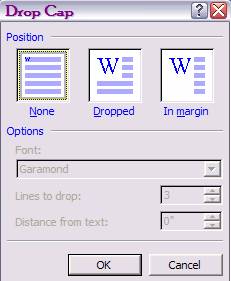 Add a drop cap to a paragraph by following these steps:
Place the cursor within the paragraph whose first letter will be dropped.
Select Format|Drop Cap from the menu bar.
The Drop Cap dialog box allows you to select the position of the drop cap, the font, the number of lines to drop, and the distance from the body text.
|
T |
Click OK when all selections have been made.
o modify a drop cap, select Format|Drop Cap again to change the attributes, or click on the letter and use the handle.
The Draw toolbar can be picked up and moved.


![]()
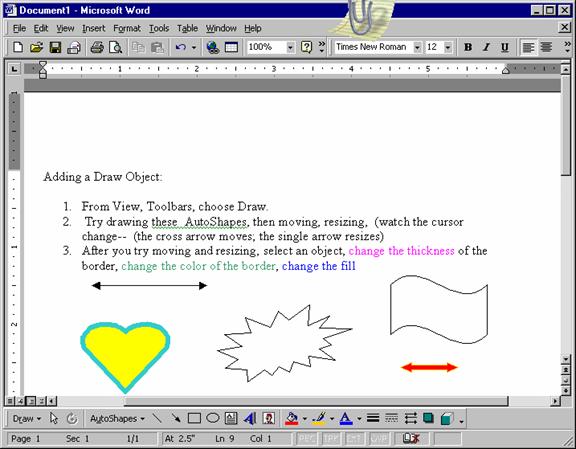
Drawing objects are different than pictures in Word. Drawing objects “float” on the screen and can be placed
directly on top of text. There are two ways to
get the text on top of the object:
- Make the fill transparent.
- Select and right click the object
- Choose format object.
- On the format menu, choose the colors and lines menu.
- On fill, select “none” or check semi-transparent.
- You can also perform other formatting tasks here if you prefer the menu over the draw toolbar.
- Make the object go behind the text.
- Select and right click the object
- Choose “order” and then “send behind text.”
- Or, Choose “Draw” then “Order” from toolbar.
Rotating an object: (PS—You Can’t Rotate a Picture)
- Select Object.
- Choose “Draw” from the toolbar, then “Rotate.”
- To free rotate, center the circular arrow around the green dot. Click, holding your mouse button down, and rotate.
Insert
a Table
There are two ways to add
a table to the document using the Insert feature:
- Click
the Insert Table button on the standard toolbar. Drag the mouse
along the grid, highlighting the number of rows and columns for the
table. If the button isn’t there, check the
double arrows for more buttons.
![[Insert a table]](maryswordideas_files/image015.gif)
- Or,
select Table|Insert|Table from the menu
bar. Select the number of rows and columns for the table and click OK.
![[Insert Table dialog box]](maryswordideas_files/image016.gif)
Draw a Table
- Draw
the table by selecting Table|Draw
Table from the menu bar. The cursor is now the image of a pencil
and the Tables and Borders toolbar has appeared. Unclick the pencil when finished.
![[Tables and Borders toolbar]](maryswordideas_files/image017.gif)
- Draw
the cells of the table with the mouse. If you make a mistake, click the
Eraser button
![[eraser]](maryswordideas_files/image018.gif) and drag the mouse over the area to be deleted.
and drag the mouse over the area to be deleted.
Inserting
Rows and Columns
Once the table is drawn, insert
additional rows by placing the cursor in the row you want to be adjacent
to. Select Table|Insert|Rows
Above or Rows Below. Or, select an entire row and right-click
with the mouse. Choose Insert Rows from the shortcut menu.
Using Fill, Color, and Merge and
Selecting Cells, Rows, or Columns
Selecting: Cursor changes to a white arrow: Selects
contents of one row.
Cursor changes to a black arrow: One click selects contests of cell, two clicks selects
row.
Move cursor to the top of the column
you want to select; changes to black arrow pointing down; selects contents
of column.
Clicking on the cross arrow once
selects contents of the whole table.
Deleting:
To delete
a table, use select it, then choose Table Menu,
Delete, Table. Using the delete key deletes the contents
but not the table.
Moving:
Use the tab
to move from cell to cell. “Enter” enlarges the cell. Use
the down or up arrow to move one cell up or down.
Filling: Select the cell, row or column you
wish to have filled with color, then click the paint
Click the paint bucket or pull down the menu to choose a different
color.
Or, right click
the table and use the borders and shading dialog box
for more choices.
Text Alignment: Note that you can use right click
for formatting options as well as the Tables and Borders for Text Alignment, sorting,
and changing the borders.
 Tip: Use tables to align pictures easily,
especially if you want to use the document as a Web page.
The pictures won’t move all over the page. To
remove the table borders, right click the table, use the borders and shading
button, and on the Borders tab, select “none” for the border line.
Tip: Use tables to align pictures easily,
especially if you want to use the document as a Web page.
The pictures won’t move all over the page. To
remove the table borders, right click the table, use the borders and shading
button, and on the Borders tab, select “none” for the border line.
![[Borders and Shading dialog box]](maryswordideas_files/image021.jpg)
Printing and Text Box Tips:
Do you need to print one page, and you have two pages?
1. From the file menu, choose print preview.
2.
 From the print preview buttons at the top of the dialog
box, choose “shrink to fit.”
From the print preview buttons at the top of the dialog
box, choose “shrink to fit.”
Word automatically shrinks your text to fit on one printed page.

Text Boxes let you move text anywhere you want
- From the draw toolbar, choose the textbox symbol or from the Insert menu choose Text Box.
- Position the the TextBox by dragging; add format features like fill, line color, border or no border.
 If you don’t want the border to show, right
click the textbox; choose Format Textbox, then choose “no line” for border.
If you don’t want the border to show, right
click the textbox; choose Format Textbox, then choose “no line” for border.

Glitter and Glitz
Word Art instructions:
Click on the WordArt Button on the draw toolbar, or on the View menu select toolbar then WordArt.
![]()
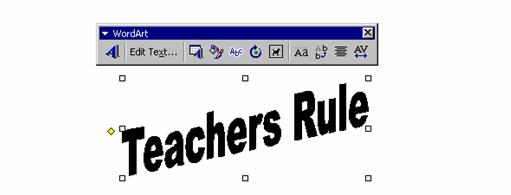
If you choose the toolbar, click the “A”, write your text. Click on each of the buttons in turn to see what happens. To free rotate, make sure the circular arrow is centered around the green circle, click and hold, then move your art. The WordArt toolbar will appear if you click once on any WordArt.
Also, click on the yellow diamond and see what happens.
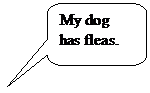
Callout Objects:
Callout Objects can be lots of fun.
Click AutoShapes, then Callouts, then click on the shape you want.
Click and drag a callout shape.
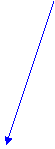
To move the speech balloon in the right direction, click and hold the yellow diamond.
The Callout is a special textbox and allows you to write what you want on the inside.
Format Painter
If you don’t want to take the time to format a section but want it to be the same as another, click in the paragraph you want, then click the Format Painter from the top menu buttons (paint brush) and drag it over the text you want to change. Double click the Format Painter button to keep it active for more than one selection.
Special Characters
Need a degree sign? Or perhaps an umlaut? Use Insert, Symbols, and find the character. If you use it often, assign it a shortcut key or an autocorrect key.
Things that ‘bug’ you in Word:
Autocorrect and auto format
Turn it off by using the Tools Menu. “AutoCorrect”. The AutoCorrect dialog box has four tabs:
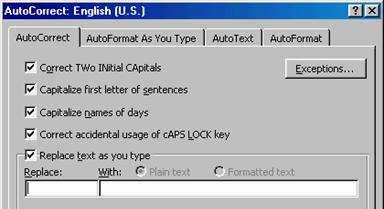
Uncheck any boxes
to make Word quit typing for you.
AutoFormat as you Type has the infamous “automatic numbered lists” checkbox.
To turn off editing options or Spelling & Grammar
options:
Choose Tools then Options:
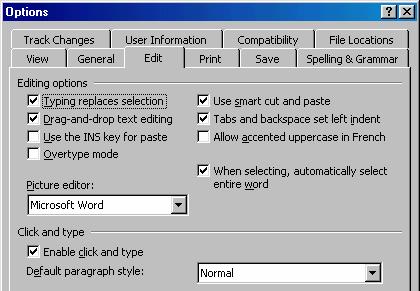
Overtype mode:
If the OVR button at the bottom of the status bar is black, you’re in overtype mode. Doubleclick it to return your sanity. You have probably accidentally hit the “insert” key above the “delete” key, which is the keyboard shortcut for Overtype mode.
Other highlights of today’s session: pictures
that won’t move, drawing objects that cover up text, and if time, Table Troubles.